Configuring a Provider
A provider connects Minder to your software supply chain — giving Minder information about your source code repositories, and their pull requests, dependencies, and artifacts.
The currently supported providers are:
- GitHub
For GitHub, you configure a Provider by creating a GitHub App.
Prerequisites
- GitHub account
Create a GitHub App
This approach allows fine-grained control over the permissions that Minder has in users' repositories. It also allows users to limit the repositories that Minder can access.
- Navigate to GitHub Developer Settings
- Select "Developer Settings" from the left hand menu
- Select "GitHub Apps" from the left hand menu
- Select "New GitHub App"

Basic Information
Complete the following fields:
- GitHub App Name:
My Minder App(or any other name you like) - Homepage URL:
http://localhost:8080

Identifying and authorizing users
Complete the following fields:
- Callback URL:
http://localhost:8080/api/v1/auth/callback/github-app/app - Add an additional Callback URL for Keycloak:
http://localhost:8081/realms/stacklok/broker/github/endpoint - Select the checkbox for "Request user authorization (OAuth) during installation"

Webhook
- Under Webhook, uncheck Active
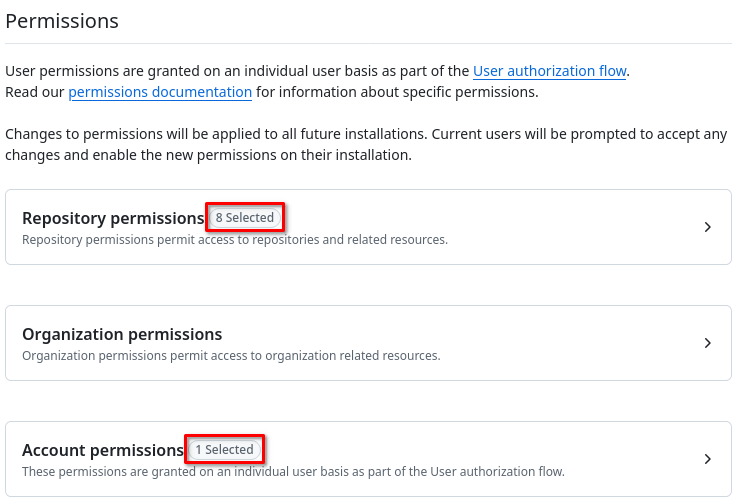
Permissions
Select the following permissions:
-
Repository Permissions:
- Administration (read and write)
- Contents (read and write)
- Metadata (read only)
- Packages (read and write)
- Pull requests (read and write)
- Repository security advisories (read and write)
- Webhooks (read and write)
- Workflows (read and write)
-
Account permissions:
- Email addresses (read only)
Once completed, double check your selected numbers match the ones in the screenshot.

Installation and Scope
For the option "Where can this GitHub App be installed?":
- Select "Any account" if you want to allow any GitHub user to install the app
- Or, select "Only on this account" to restrict the app to only your account.
Then select "Create GitHub App" to create the App.

Generate a client secret
You should now have a GitHub App created. You now need to create a Client secret for authentication.
Click the Generate a new client secret button.

Save the Client secret value for use in the Configure Minder step.
Generate a private key
Scroll down to the bottom of the page and generate a private key.

This will generate and download your private key.
Now we need to move and rename the private key.
Run the following commands from the Minder root directory, replacing <downloaded-file> with the path to the downloaded private key.
mkdir .secrets
cp <downloaded-file> .secrets/github-app.pem
Configure the Minder server
Now that we've created our GitHub App, we need to configure the Minder server to use it.
Add GitHub App configuration
In your server-config.yaml file, located in the root Minder directory, find the following section:
github-app:
  client_id: "client-id"
  client_secret: "client-secret"
  redirect_uri: "http://localhost:8080/api/v1/auth/callback/github-app/app" # This needs to match the registered callback URL in the GitHub App
Update the client_id and client_secret values with the following:
- Client ID : Found in the General -> About section of your GitHub App on GitHub.

- Client Secret : The value you saved previously.
Add Provider configuration
Then, find the following section in the same server-config.yaml file:
provider:
  github-app:
    app_name: "app-name"
    app_id: 1234
    user_id: 1234
    private_key: ".secrets/github-app.pem"
Update the app_name with the name of your app, which you can get by looking at the GitHub URL when editing your GitHub App. For example, if the URL is https://github.com/settings/apps/my-test-app, then your app name is my-test-app.

Update app_id with the app ID of your GitHub App, which is found in the General -> About section of your GitHub App on GitHub.

Finally, you need the user_id value. To get the value, run the following command, where <app-name> is the App name you used above:
curl https://api.github.com/users/<app-name>%5Bbot%5D
Update the user_id value with the id value returned from that command.

Now save the file. Your Provider is now created and the Minder server is configured to use it.